How To Install Z Flashing Over A Door Rating: 5,5/10 686 votes
Install Z-flashing over the door casing at the top of the opening 5. Apply thick bead of caulk along the sides and top of opening. Replace a prehung exterior door with This Old House. Click through to watch this video on thisoldhouse.com. While you're stuck at home, make the most of your time by learning a new language, skill. Z flashing is commonly used in combination with J molding or J channel to prevent water from leaking behind siding when attaching exterior elements such as a deck ledger board to a vinyl-sided house. The Z flashing sits atop the ledger board while the J molding is used on the sides and can also be used along the bottom of the opening created in.
An important part of installing new doors and windows on your home is properly sealing them. Gaps around the window or door can create drafts, which can increase your energy costs, or allow water to leak inside, causing water damage or mold growth.
Photoshop cs mac. Look up titles, filenames, SHA1, PN #.
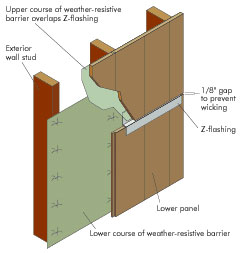
One material used across the top of an exterior door frame is called Z-flashing. The Z-flashing, sometimes called a drip cap, is a strip of metal that resembles the letter 'Z' when viewed in profile. The Z-flashing seals the joint along the top of the door casing. 7Cover the top edge of the Z-flashing with building paper.
In new construction, the paper should already be on the house before the doors and windows are installed. In an existing house, you may have to cut a piece for this project.
If so, cut it wide enough to extend several inches on both sides of the door, and high enough to extend at least one foot above the door. The building paper is stapled to the side of the house. Vpn port forwarding mac. shimo vpn client for mac pro. Seal the joint above the casing by applying caulk and pressing the paper down upon it. Building paper is paper that is saturated with asphalt and provides protection against wind and moisture.

Aviation snipsIn this video, This Old House general contractor Tom Silva shows how to fabricate custom-fit aluminum window flashing.Steps:1. Cut a piece of 8-inch-wide aluminum flashing to length using aviation snips; you could also slice through it with a sharp utility knife.2.
Measure for the leading edge of the flashing to determine how far it'll hang down in front of the window trim.3. Use a metal brake or homemade bending brake to bend the leading edge of the flashing passed 90 degrees.4. Make a gauge block from scrap wood to represent the thickness of the window casing and trim.5. Slide the flashing into the brake, using the gauge block to position it at the proper depth.6. Bend the flashing to create the wide flange that extends up the wall.7. If using a homemade bending jig, set the 2x4 tapping block on top of the bent flashing and strike hit it with a hammer before removing it from the jig.